> For the complete documentation index, see [llms.txt](https://hackerbot-industries.gitbook.io/documentation-hackerbot-industries/llms.txt). Markdown versions of documentation pages are available by appending `.md` to page URLs; this page is available as [Markdown](https://hackerbot-industries.gitbook.io/documentation-hackerbot-industries/tutorials/basic-examples.md).
# Basic Examples
**Before You Begin...**\
Make sure you’ve completed the following setup steps:
* ✅ Set up your robot by following the instructions [**here**](/documentation-hackerbot-industries/getting-started/unboxing-your-robot.md).
* ✅ Update the firmware using the instructions [**here**](/documentation-hackerbot-industries/getting-started/updating-the-firmware.md).
* ✅ Install the required software using the instructions [**here**](/documentation-hackerbot-industries/software/software-install-and-overview.md).
Once everything is set up, you’re good to go!\
The following programs will run on the Raspberry Pi 5 inside your robot.\
You can connect via **SSH**, **VNC**, or even link **VS Code** to your Pi over SSH for development.
***
### 👟 Movement
{% hint style="info" %}
Model supports: All versions
{% endhint %}
* **Moving the base with command velocity**
```python
from hackerbot import Hackerbot
bot = Hackerbot()
bot.base.drive(0, 65) # Turn around
bot.base.drive(200, 0) # Move forward
bot.base.destroy(auto_dock=True) # Destroy instance and dock to charger
```
* **Navigation with SLAM**
```python
from hackerbot import Hackerbot
bot = Hackerbot()
bot.base.maps.goto(1.0, 1.0, 0.0, 0.1)
bot.base.destroy(auto_dock=True) # Destroy instance and dock to charger
```
The robot will first try to localize itself in the map then navigate to the destination.
To understand the map & positions better, check out [command center](/documentation-hackerbot-industries/software/command-center.md).
***
### 🗣️ Voice
{% hint style="info" %}
Model supports: AI, AI PRO, AI ELITE versions
{% endhint %}
* **Text to speech (TTS)**
The Hackerbot Python package uses [Piper TTS](https://github.com/rhasspy/piper) for speech synthesis.
1. Use the [Piper tts tool](https://piper.ttstool.com/) to find the voice you want for your Hackerbot.
2. Navigate to the :hugging: [directory](https://huggingface.co/rhasspy/piper-voices/tree/main) and select the model you want to use:
3. Copy the name of your model to your script, and utilize the `speak` functionality:
```python
bot.base.speak(model_src="en_GB-semaine-medium",text="Didi dadodoooo", speaker_id=None)
```
* **Speech to text (STT)**
Currently, speech to text isn't officially supported. However, there are many speech to text functions out there you can try, e.g. [OpenAI](https://platform.openai.com/docs/guides/speech-to-text), [Google Speech to Text](https://cloud.google.com/speech-to-text), or the most common [SpeechRecognition](https://pypi.org/project/SpeechRecognition/).
***
### 👁️ Vision
{% hint style="info" %}
Model supports: AI, AI PRO, AI ELITE versions
{% endhint %}
Before trying out some of the coolest examples, make sure you have the dependencies:
```sh
cd ~/hackerbot/hackerbot-tutorials/vision
pip install --no-cache-dir -r requirements.txt # This install will take a while
```
{% hint style="info" %}
To view the cv window, make sure you're running the following in [VNC](/documentation-hackerbot-industries/getting-started/install-the-raspberry-pi-os-+-wifi.md#setup-remote-connection).
{% endhint %}
* **Image Recognition with YOLO**
```sh
cd ~/hackerbot/hackerbot-tutorials/vision/image_rec
python3 yolo.py
```
YOLOv11 Recognizing everything on my desk!
Tap the "q" key on your keyboard to quit.
* **Image Recognition with the AI Kit**
Check out our tutorial on [getting started with the AI Kit here](/documentation-hackerbot-industries/tutorials/utilizing-ai-kit.md)
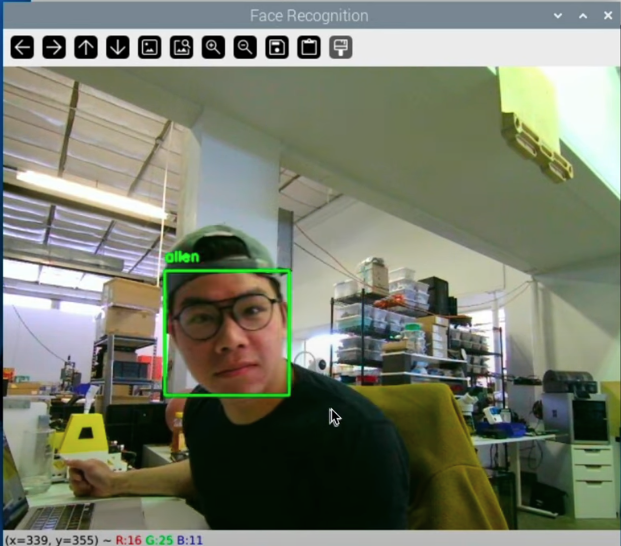
* **Face Recognition**
Navigate to the directory:
```sh
cd ~/hackerbot/hackerbot-tutorials/vision/face_rec
```
Take some headshots, it'll take a number of pictures between every delay.
```sh
python3 headshots_picam.py --name Bobby --num_photos 10 --delay 2
```
Then train the model by running:
```sh
python3 train_model.py
```
Then use it to recognize your face by running:
```sh
python3 facial_req.py
```
Your Hackerbot now recognizes you!
***
### 🤖 Head Movement
{% hint style="info" %}
Model supports: AI PRO, AI ELITE versions
{% endhint %}
Now you can utilize the camera to recognize objects and person, try look around to scan for faces!
```sh
cd ~/hackerbot/hackerbot-tutorials/vision/face_rec
python3 look_around.py --name Bobby
```
***
### 🦾 Arm & Gripper Manipulation
{% hint style="info" %}
Model supports: AI ELITE versions
{% endhint %}
More cool examples coming soon! At the mean time, just smile and wave!
```python
import time
from hackerbot import Hackerbot
bot = Hackerbot()
bot.arm.move_joints(90, 50, 0, -60, -90, 0, 100) # Move to right
time.sleep(1.5)
bot.arm.move_joints(90, -20, 0, 0, -90, 0, 100) # Move to left
time.sleep(1.5)
bot.arm.move_joints(0, 0, 0, 0, 0, 0, 100) # Center to straight position
time.sleep(1.5)
bot.destroy() # Destroy instance
```
***
### 👣 References
* [Face recognition with Raspberry Pi](https://core-electronics.com.au/guides/face-identify-raspberry-pi/)
* [Piper TTS Documentation](https://github.com/rhasspy/piper)